Hello friends and Happy December! The year is winding down, the holiday season is here and that means that its time to mail your Christmas cards, start checking off your gift list and stock up on the eggnog... Mmmmmm, eggnog latte .... sorry, got a little distracted there :) Knowing that the holidays can be hectic, expensive and over commercialized, I think its important that we slow down and focus on the important.
With that said, I present to you my 12 days of home-made budget friendly gifts. There are a few items I want to make and I thought why not share it with you. The levels of personalize will vary because some will be geared towards teachers, classmates where as others will be for family and/or close friends.
On my first day ... (of Christmas) ... I bring to you a linen bag.
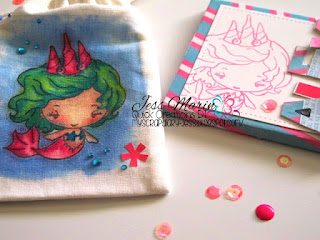
I know you're thinking, a linen bag! who wants that?! But its not a regular linen bag, its a pretty one made for the crafty friends in your life. Ok so the purpose of this mini gift set you see in the picture is to send some crafty bits and bobs, such as wood pieces, clips, sequins, ribbons, project life cards, pretty much whatever you have extra in your stash that you want to share.
I created this bag the following way: I stamped this uber cute mermaid image, "
Shelly" from the greeting farm using memento ink. I then carefully colored her up with markers, approx 2-3 markers per color. If you try this, be careful of the bleeding. I had a hard time especially with the pink colors, I think it has something to do with the pigmentation. You can minimize the bleeding by coloring close to the line but not up next to it. After I was done with the coloring, I added a few gems, attached a home made tassel and filled it with the goodies that will go along with it. Along with the linen bag, I created a mini 3x3 bulky envelope to hold my greeting card and the more sensitive items, such as the wood pieces. This was simple to make, all I needed was a 6x6 sheet of paper and the weRmemory envelope board. This is a great way to use up your 6x6 paper pad stash.
I hope that this inspires you to get creative and make your own crafty stash mini gift. Although I colored up an image, you can different mediums and items to decorate your linen bag and envelope. I will be back in a few days with day 2.
Since today is my day over on the
Quick Creations blog/shop make you sure you hop over where you'll find my post along with the materials I used linked to the shop. While there make sure you take a look around as Noelle is currently having a
Black Friday Sale. Thanks for stopping by!
SUPPLIES
Image: The Greeting Farm - Shelly
Linen Bag: Recollections brand
Paper: Dear Lizzy - Serendipity
Medium: Prismacolor Markers. Memento Ink. Basic Grey gems.


